Preparing Your Bathroom Tiles for Painting
Before you begin with ceramic tile paint, preparing your tiles is critical. This ensures the paint adheres well and looks good for years.

Clean and Remove Limescale
Start with thorough cleaning. Use hot, soapy water and a scouring pad to scrub your tiles. Focus on removing limescale deposits. These can prevent the paint from sticking.
Eliminate Mould and Mildew
Check for mould or mildew, especially in grout lines. Treat these areas with a fungicidal wash. This step is vital for a healthy bathroom environment.
Protect Surrounding Areas
Finally, safeguard areas you don’t want painted. Use masking tape to cover walls and cabinets adjacent to the tiles. Lay down newspaper or an old sheet to protect the floor. With your tiles clean, mould-free, and surrounding areas protected, you’re ready to start painting.
Priming Before Painting
Priming your bathroom tiles is a key step before applying ceramic tile paint. A primer aids in ensuring a smooth and lasting finish by providing a uniform surface for the paint to adhere to. Also, it helps to block stains and prevent paint peeling or flaking off. Typically, one coat of tile primer is enough, but make sure it dries completely, which usually takes about four hours.
The Role of Tile Primer
Tile primer works as a base for ceramic tile paint. It creates a bond between the tile surface and the paint. This makes the paint stick better and last longer. If you’re using a primer, follow the instructions on the can for the best results. Remember to allow the primer to dry fully before moving to the next step.
When to Skip Priming
You can skip priming if the ceramic tile paint you’ve chosen is a specialist tile paint. These paints are designed to adhere directly to tiles without the need for a separate primer. Choosing this type of paint simplifies the process and saves time. However, if you’re using a different kind of paint, don’t skip the primer. It’s crucial for creating a durable finish.
Choosing the Right Ceramic Tile Paint
Once you have prepared and primed your bathroom tiles, the next important step is selecting the right ceramic tile paint. Not all paints are suitable for tiled surfaces. You’ll want to pick a product that ensures durability and water resistance.
Specialist Tile Paint Options
Specialist tile paint is the ideal choice for bathroom tiles. These paints stick to ceramic surfaces without a primer. They resist moisture and steam, which is crucial in a bathroom setting. Look for brands that offer a range of colors. This way, you can match your bathroom’s theme. Apply the paint as directed on the product label. Always wait for the first coat to dry before adding a second layer.
Oil-Based Enamel as an Alternative
If specialist tile paints aren’t available, oil-based enamel can be a good alternative. Choose semi-gloss or high gloss finishes as they tolerate humidity well. High gloss finishes also make cleaning easier. Remember, oil-based enamels take longer to dry. They also have a strong odor, so ensure good ventilation. Apply paint gently to avoid brush marks. Allow each coat to dry thoroughly before applying the next.
The Painting Process
Applying ceramic tile paint properly is crucial for an attractive and enduring finish. Here’s how you can achieve the best results during the painting process.
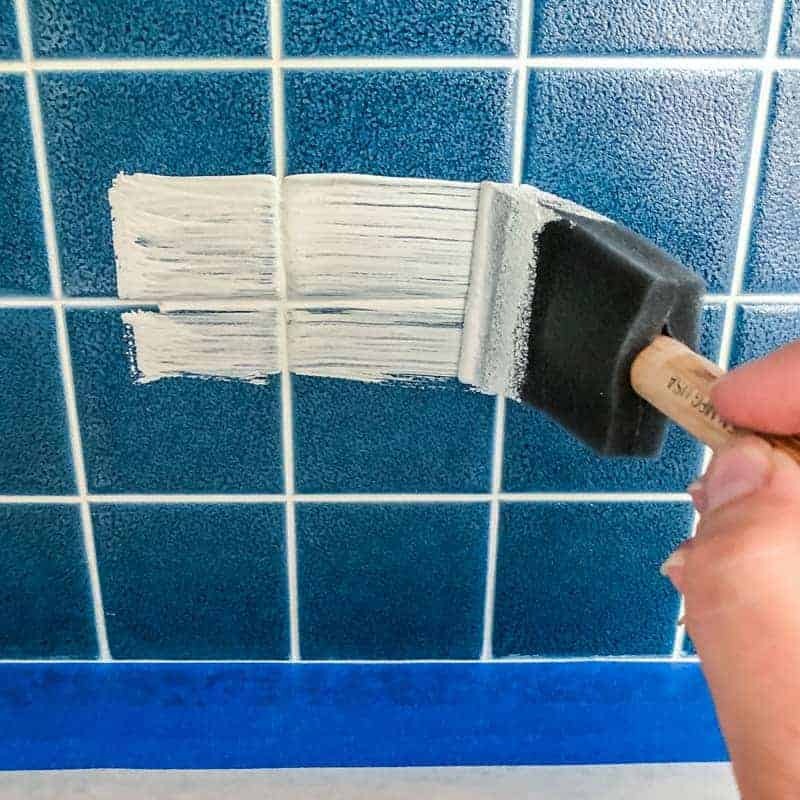
Using a Roller for Even Coverage
When applying ceramic tile paint, a roller can provide you with even coverage. Rollers make it easy to cover large areas quickly and smoothly. Use a medium nap roller for best results. Be sure to roll the paint in one direction. Overlapping strokes may lead to a textured finish. Remember to cover only one small section at a time. This helps maintain a wet edge and avoids streaking.
Brush Techniques for Grout Lines
After rolling, use a brush for the detailed work. Brushes are perfect for getting into the grout lines and edges. Small, angled brushes work best for precision. Dip only the tip of the brush into the paint. This prevents dripping and ensures a clean line. Stroke the brush along the grout lines. Don’t rush; take your time to avoid smudging. For edges, use smooth, light strokes. Keep a steady hand to create a sharp, even border.
Applying Multiple Coats
Applying multiple coats of ceramic tile paint is essential for durability and appearance. Two coats are often enough to achieve a robust and even finish. It is crucial that each layer is dry before adding the next. This helps prevent peeling and ensures a professional look.
Drying Time Between Coats
Allow the first coat of paint to dry for at least four hours. This drying time is necessary for the paint to set properly. Rushing this step can lead to a substandard finish. The paint needs to be not just touch-dry but thoroughly dry. If the paint feels at all tacky, allow more time.
Final Coat Application Tips
For the final coat, apply paint with precision and care. This coat determines the overall smoothness and uniformity of the finish. Work in small sections and use a fresh roller or brush. Check for drips or uneven areas and smooth them out immediately. After the final coat, give the tiles more drying time. This sets the paint and helps it last longer.
Once you’ve applied the final coat, step back and inspect your work. Touch up any spots that might need more paint. Allow the last coat to dry fully for the best results. With patience and careful application, your bathroom tiles will look refreshed and revitalized for years to come.
Post-Painting Care
Taking care of your bathroom tiles after painting them is key to longevity and beauty. It’s not just about the right paint application; the steps you take after painting are just as crucial. Here’s how to treat your tiles post-painting.
Wait Time Before Water Exposure
After that last brush stroke, patience is critical. Give your tiles a good 24 hours before they come into contact with water. This wait time ensures the ceramic tile paint sets and hardens properly. Skipping this step could spell disaster for your fresh paint job, leading to water damage and peeling.
Cleaning Your Painted Tiles
Once dried, your tiles will need the right cleaning approach to stay shiny. Use non-abrasive cleaning products and soft cloths. This preserves the paint’s finish and keeps your bathroom looking great. Harsh scrubbing can scratch and wear down the paint, so treat your tiles gently. Stick to routine cleaning to maintain that new-tile gleam, and avoid harsh chemicals that can dull or damage the paint.
Advantages of ceramic tile paint
Cost-Effective Solution
One of the main advantages of using ceramic tile paint is its cost-effectiveness. Replacing tiles can be a major expense, as it involves not only the cost of the new tiles but also the labour for removing the old ones and installing the new ones. In contrast, ceramic tile paint offers a much more affordable alternative. By simply painting over the existing tiles, you can achieve a brand-new look without breaking the bank.
Versatility
Another advantage of ceramic tile paint is its versatility. With a wide range of colours and finishes available, you can easily customise the look of your tiles to suit your personal style and home decor. Whether you prefer a glossy, matte, or textured finish, there are ceramic tile paints to meet your needs. This versatility allows you to create a unique and customised look for your home, without the limitations of traditional tile options.